
Changing a futile trash disposer might appear intimidating. There is a reasonable fear about power as well as water, the unacquainted sink association as well as sufficient drain fixtures to make leakages an actual probability. Then there are the difficulties of contrast shopping as well as the doubt that the job might run into real money. Thus lastly, useless disposers do not frequently leak and escape, however, not at the start. Thus it is easy to set things off. So let’s take a look at the easy way of how to replace a garbage disposal.
If theses noises familiar, then you will be glad to recognize that substituting a disposer is simple. Through today’s plastic leftover kits and tools, leakages are rarely a problem as well as the electrical networks are likewise rapid plus easy. Before you purchase, however, it pays to inspect your previous old unit to ensure that it is not merely jammed and blocked.

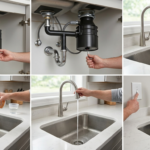
How to Replace a Garbage Disposal
STEP 1: SWITCH OFF ELECTRICITY
Start by switching off the electricity power to the unit on the service panel. Eliminate the shelter from the base of the disposer, release and loosen the ground bolt as well as remove both cable connectors.
STEP 2: LOOSEN AND RELEASE THE BOLTS
In this step, release the hose clamp on the dishwasher and discharge pipe as well as pull the hose pipe from its fixtures and fitting. To unfasten the drain support, release the screws that fix the drain projection to the disposer.
STEP 3: ELIMINATE THE PREVIOUS UNIT
Disposers attach to the basin sewer fittings in many ways certain practice threaded plastic and soft nuts, further large hose pipe clamps, however, the mounting ring Association is the most public. To eliminate the disposer, maintenance it from underneath as well as revolving the large, 3-tab mounting ring at the first counter-clockwise up until the unit drops away. Eliminate the rest of the drain association by untying the three nut bolts as well as snooping off the retentive ring. Push the sewer out by the basin hole as well as clear away several old putty or caulk.
STEP 4: PUT ON PUTTY
To put in the new and fresh drain association, you first need to roll a knoll of plumbers putty on the stand up until you have a 10-inch long piece and ½ inch thick. Now you need to stick this putty around the underneath of the sewer as well as press the sewer or drain firmly into the basin hole.
STEP 5: FINISH THE DRAIN
To stop the drain association, slip the cardboard washer as well as backup and standby ring on the sewer spud.
STEP 6: SNAP THE RING
In this step follow through the rising projection as well as the retentive ring. Snap the retaining or retentive ring on the sewer spud.
STEP 7: TIGHTEN
Tighten up the nut bolts through a positioned screwdriver up until best of the putty squeezes or crushers out as well as the sewer senses snug and warm in the basin.
STEP 8: WIRE IT UP
It is typically easier and informal to wire the fresh and original disposed of beforehand you fit it. If the previous fitting was ended deprived of flexible and elastic conduit or pipe, currently is the period to upgrade.
Initiate by winding the previous box connector keen on the base of the fresh new disposer.
STEP 9: FINISH IT UP
Take along the circuit cables as well as a conduit or pipe into the connector plus save the conduit. Link the black color circuit cable as well as the black lead in single cable connector, plus the white color circuit cable as well as the white lead in another. Bind and fix the circuit ground cable below the green color ground bolt as well as a substitute the cover.
STEP 10: FITTING THE NEW AND FIRST-HAND UNIT
New and first-hand disposers come along through a dishwasher release nipple in place, on the other hand, the nipple comes plugged inside the case you do not have a dishwasher. If you aim is to practice the dishwasher fitting, push the plug or switch out through a screwdriver as well as approach into the disposer to recover it.
STEP 11: FITTING THE NEW UNIT
Lift up the disposer to the basin sewer as well as involving the tabs of the mounting and rising ring. Once the ring in progress, slip-up a screwdriver into any of the tab slots as well as revolves the ring in a clockwise direction up until it undersides out.
STEP 12: FITTING THE FRESH AND FIRST-HAND UNIT
In this step to plumb and aligned the disposer’s sewer outlet opening, fit the rubber seal washer properly over and above the flange finish of the soft and plastic cross piece, after that slide and slip the metallic flange protection on from the new end. Tip up the bottoms of the metallic flange hooked on its slit in the disposer as well as tighten up the fastening screw bolt by the top side of the flange.
STEP 13: INSTALLING P-TRAP
In the last step, you need to trim as well as the crosspiece to the dimension and length, link it to the sewer tee as well as fit the P trap.


0 Comments